
Last winter, I did a small bit of work on the floor plan layout for a back yard garden house renovation in Charleston, SC. Unlike the usual e-design/decorating project, this project was strictly to create a plan for the functional layout of the small space for the builder to go by. The client's originally contacted an architect colleague of mine and due to her time constraints, she referred me. As I am more often than not the last person called on a job, it was a lot of fun for me to really start with an empty shell and create something with it that met the needs of the clients.
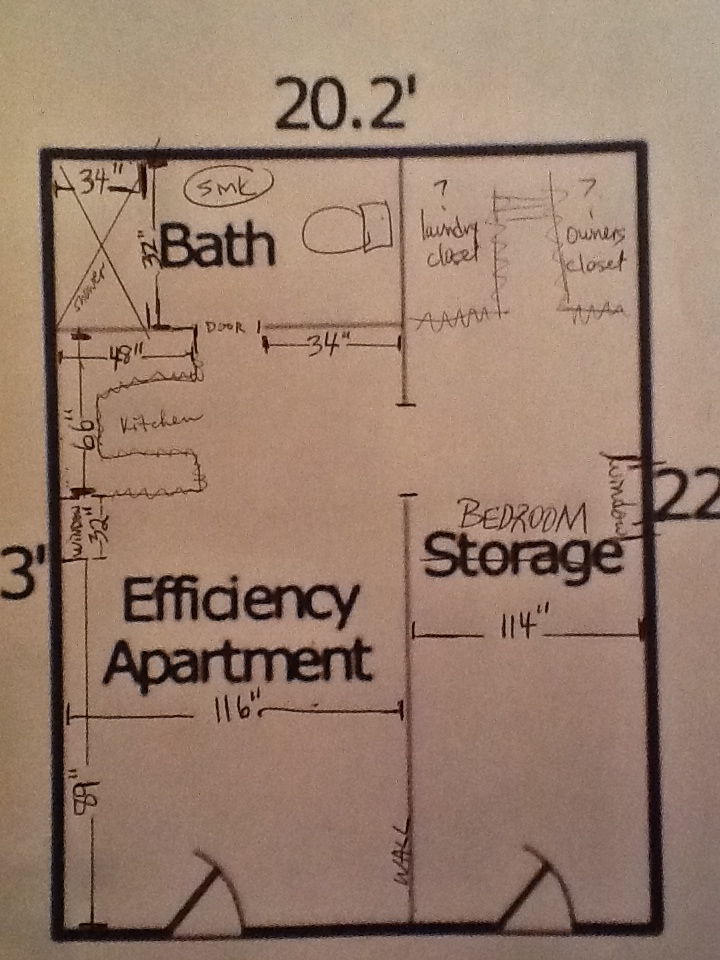
The building is approximately 450 sq. ft. and this floor plan (with measurements confirmed by the clients) was what I had to go by. Oh, and these "before" photos:

Top left: is the front right side of the house, top/bottom right the bathroom, bottom left the back end of the left side of the building. (hope that all made sense)
The program for the project called for: a kitchen with cook top, refrigerator, dishwasher and microwave; living/dining area; bedroom; a washer/dryer; lockable storage closet; clothes closet. The house would be used by the family at times, and also be available for rental, which was the reason for the lockable closet. They also wanted to do the project in as efficient manner as possible, so all the plumbing had to stay where it was - in the back of the building with as little change as possible.
Below are some of the various versions of the plan I came up with on the way to the final plan:

One thing to note, since I am not familiar with South Carolina building codes, my plan had to leave room for the builder to follow existing code requirements. Additionally, the company providing the kitchen cabinets would have to do their own final plan based on the client's cabinetry selections. So, there were some parts of the plan that were left intentionally vague, or even blank.
The above plan was my initial attempt to keep all plumbing against the back wall of the structure, which made for an uncomfortable placement of the sink. I also tried to maintain as much option for privacy in the small space should two (or more) people be there at the same time. This is the reason for the closets and laundry to be separate from the bedroom. Of course, this really made the rooms very small...
This next version (above) is where I tried to flip flop the space giving as much room to the living/kitchen area as possible. It's not bad and I liked that the bathroom was not right off the public space, but that's more kitchen than was needed and the closets were very cramped.

This view shows that we were getting there. The original general layout was back. We were looking at how much counter space was possible, though it's obvious this wasn't a great idea. I was also still trying to maintain a more private bedroom by keeping a diving wall with the laundry closet and storage closets.

It was the clients who felt that they didn't need that diving wall, which makes the bedroom feel much more spacious. And let's face it, when you're dealing with such a small overall space, every inch matters.

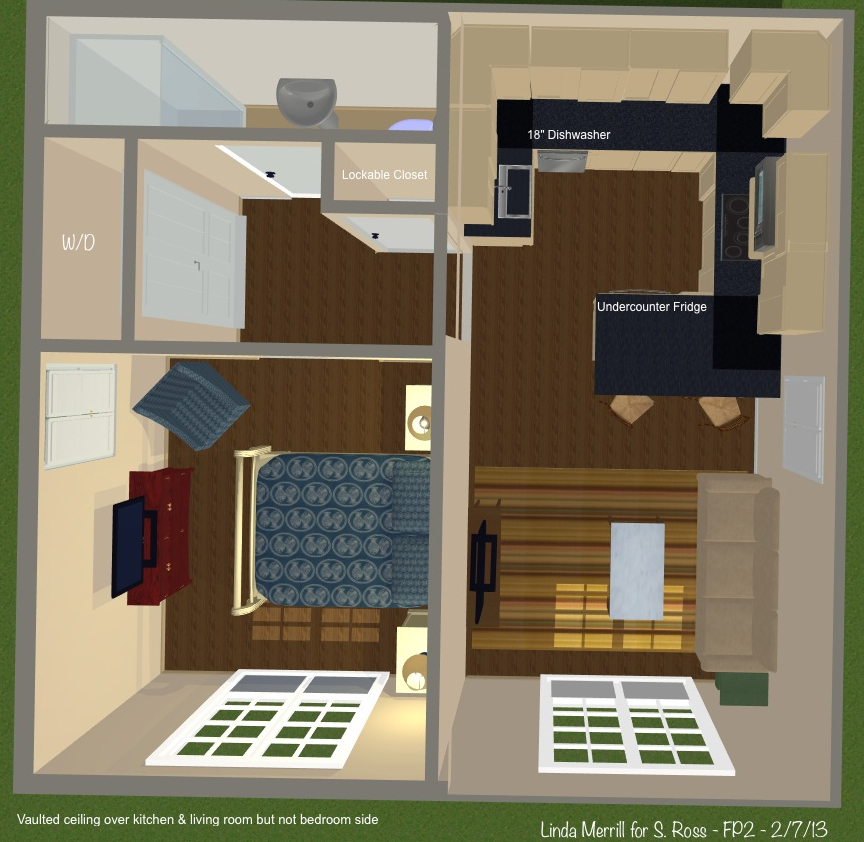
This is the final floor plan above. The attic was opened up with the center wall diving the two halves of the space. Skylights were added, as were windows high up on the diving wall to let in light and air and add to a sense of spaciousness.
And how the space is now:


Below is a construction process shot of the three closets: left has stacked washer/dryer, middle and right are clothes and storage.

It's a tiny space, but it's not lacking in amenities and I think feels very comfortable and livable in the end. This house is currently available for rent, read more here.
If you would like my help on your design or renovation project, I would love to chat with you!
0 comments:
Post a Comment